logo头像

我有一个梦想

日夜间及换肤(二)-原理分析

本文于 851 天之前发表,文中内容可能已经过时。

[TOC]

原始地址:日夜间及换肤(二)-原理分析

官方原理

img

在官方的推荐方法中,我们发现了每次设置完Mode或者Theme都需要recreate()才会生效,这是为什么呢?

1
2
3
4
5
6
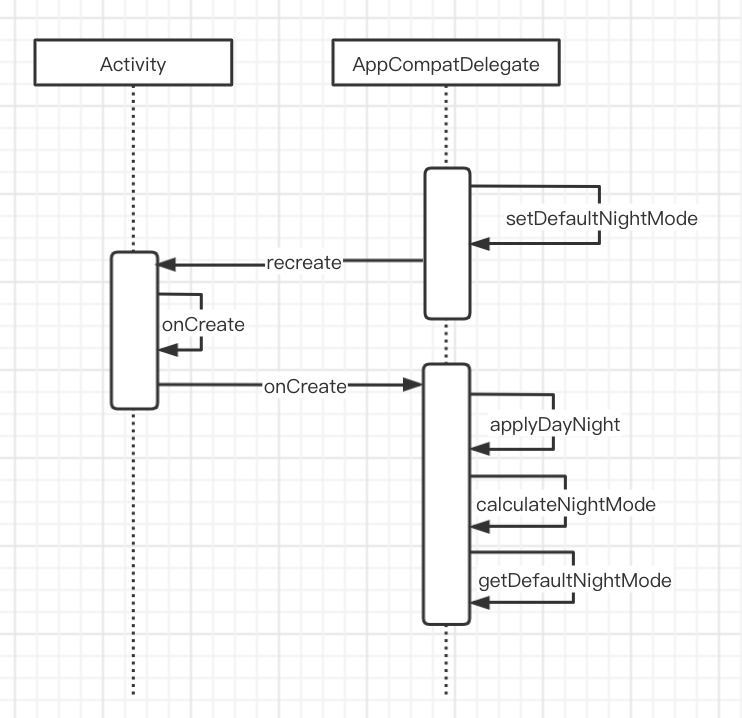
/**
* Cause this Activity to be recreated with a new instance. This results
* in essentially the same flow as when the Activity is created due to
* a configuration change -- the current instance will go through its
* lifecycle to {@link #onDestroy} and a new instance then created after it.
*/

使用新实例重新创建此活动。 这导致与由于配置更改而创建 Activity 时的流程基本相同————当前实例将通过其生命周期到达onDestroy ,然后在它之后创建一个新实例

即当前Activity进入onDestroy,重新创建一个Activity,所以会执行新Activity的生命周期

1
2
3
4
5
6
7
 @Override
protected void onCreate(@Nullable Bundle savedInstanceState) {
final AppCompatDelegate delegate = getDelegate();
delegate.installViewFactory();
delegate.onCreate(savedInstanceState);
super.onCreate(savedInstanceState);
}

进入delegate.onCreate()方法中

1
2
3
4
5
6
7
8
9
10
11
12
@Override
public void onCreate(Bundle savedInstanceState) {
// attachBaseContext will only be called from an Activity, so make sure we switch this for
// Dialogs, etc
mBaseContextAttached = true;

// Our implicit call to applyDayNight() should not recreate until after the Activity is
// created
applyDayNight(false);

...
}

点击进入applyDayNight方法中

1
2
3
4
5
6
7
8
9
10
11
12
private boolean applyDayNight(final boolean allowRecreation) {
if (mIsDestroyed) {
if (DEBUG) {
Log.d(TAG, "applyDayNight. Skipping because host is destroyed");
}
// If we're destroyed, ignore the call
return false;
}

@NightMode final int nightMode = calculateNightMode();
...
}

进入calculateNightMode()中

1
2
3
4
5
6
7
8
9
10
11
12
13
14
15
16
17
18
19
20
21
22
23
24
25
26
27
 @NightMode
private int calculateNightMode() {
return mLocalNightMode != MODE_NIGHT_UNSPECIFIED ? mLocalNightMode : getDefaultNightMode();
}

public static int getDefaultNightMode() {
return sDefaultNightMode;
}

public static void setDefaultNightMode(@NightMode int mode) {
...
switch (mode) {
case MODE_NIGHT_NO:
case MODE_NIGHT_YES:
case MODE_NIGHT_FOLLOW_SYSTEM:
case MODE_NIGHT_AUTO_TIME:
case MODE_NIGHT_AUTO_BATTERY:
if (sDefaultNightMode != mode) {
sDefaultNightMode = mode;
applyDayNightToActiveDelegates();
}
break;
default:
Log.d(TAG, "setDefaultNightMode() called with an unknown mode");
break;
}
}

获取mode类型后进行加载日夜间效果,所以在该方式下要达到动态切换,势必要重新执行onCreate方法

androidx中sdk中已经将recreate方法放入setDefaultNightMode()方法中,所以不需要手动调用

无论通过AppCompatDelegate.setDefaultNightMode还是delegate.setLocalNightMode,都会执行到updateForNightMode方法

1
2
3
4
5
6
7
8
9
private boolean updateForNightMode(@ApplyableNightMode final int mode,
final boolean allowRecreation) {
...
ActivityCompat.recreate((Activity) mHost);
handled = true;
...

return handled;
}

执行recreate重新构建Activity

第三方库实现原理

Android-skin-support

原理分析(SdkVersion = 29)

img

怎么做到的呢?

我们回顾一下setContentView()的加载过程:

1
2
3
4
5
6
7
8
9
10
11
12
13
14
public class MainActivity extends AppCompatActivity {

@Override
protected void onCreate(Bundle savedInstanceState) {
super.onCreate(savedInstanceState);
setContentView(R.layout.activity_main);
}
}

//androidx.appcompat.app.AppcompatActivity
@Override
public void setContentView(@LayoutRes int layoutResID) {
getDelegate().setContentView(layoutResID);
}

进入代理中查看实现:

1
2
3
4
5
6
7
8
9
10
11
12
13
14
//androidx.appcompat.app.AppcompatDelegateImpl
@Override
public void setContentView(int resId) {
//初始化DecroView
ensureSubDecor();
//获取Content根布局
ViewGroup contentParent = mSubDecor.findViewById(android.R.id.content);
//移除所有布局
contentParent.removeAllViews();
//加载布局
LayoutInflater.from(mContext).inflate(resId, contentParent);
//布局状态接口通知
mAppCompatWindowCallback.getWrapped().onContentChanged();
}

进入inflate方法中:

1
2
3
4
5
6
7
8
9
10
11
12
13
14
15
16
17
18
19
20
21
22
23
//android.view.LayoutInflater
public View inflate(@LayoutRes int resource, @Nullable ViewGroup root) {
return inflate(resource, root, root != null);
}

public View inflate(@LayoutRes int resource, @Nullable ViewGroup root, boolean attachToRoot) {
final Resources res = getContext().getResources();

...
// 根据XML预编译生成compiled_view.dex, 然后通过反射来生成对应的View,从而减少XmlPullParser解析Xml的时间
// 需要注意的是在目前的release版本中不支持使用
View view = tryInflatePrecompiled(resource, res, root, attachToRoot);
if (view != null) {
return view;
}
//使用xml进行解析返回一个XmlResourceParser,内部最终会进入native方法进行解析
XmlResourceParser parser = res.getLayout(resource);
try {
return inflate(parser, root, attachToRoot);
} finally {
parser.close();
}
}

进入inflate中:

1
2
3
4
5
6
7
8
9
10
11
12
13
14
15
16
17
18
19
20
21
22
23
24
25
26
27
28
29
30
31
32
//android.view.LayoutInflater
public View inflate(XmlPullParser parser, @Nullable ViewGroup root, boolean attachToRoot) {
synchronized (mConstructorArgs) {
...

try {
//找到START_TAG,否则报异常,说没有入口
advanceToRootNode(parser);
final String name = parser.getName();

...

//如果是merge标签,查看merge是不是根节点,不然的话抛出异常
if (TAG_MERGE.equals(name)) {
if (root == null || !attachToRoot) {
throw new InflateException("<merge /> can be used only with a valid "
+ "ViewGroup root and attachToRoot=true");
}

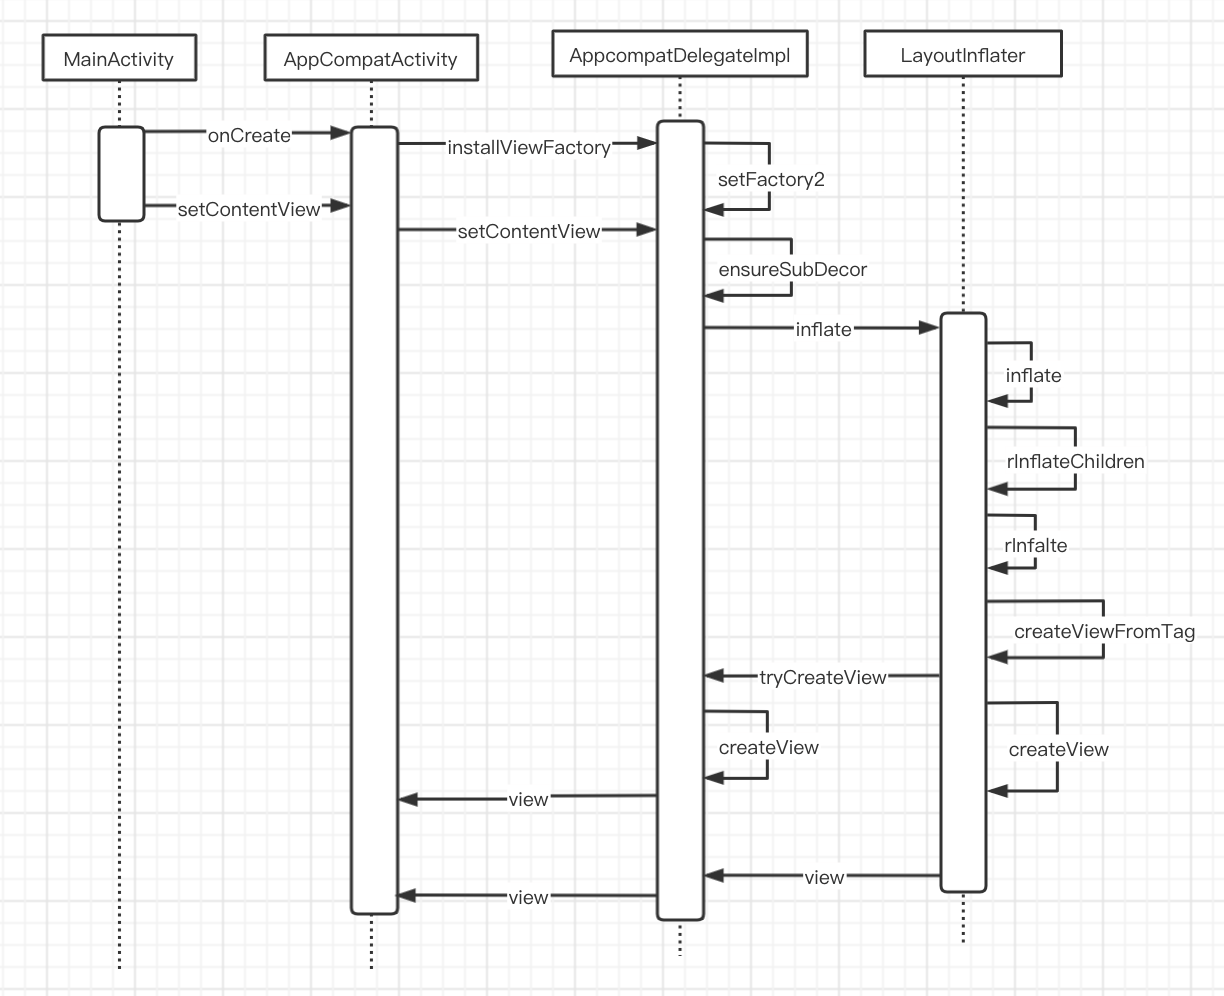
rInflate(parser, root, inflaterContext, attrs, false);
} else {
// Temp is the root view that was found in the xml
//获取根节点View
final View temp = createViewFromTag(root, name, inflaterContext, attrs);
...
//渲染根节点的孩子们
rInflateChildren(parser, temp, attrs, true);
...

return result;
}
}

进入rInflateChildren()中:

1
2
3
4
5
6
7
8
9
10
11
12
13
14
15
16
17
18
19
20
21
22
23
24
25
26
27
28
29
30
31
32
33
34
35
36
final void rInflateChildren(XmlPullParser parser, View parent, AttributeSet attrs,
boolean finishInflate) throws XmlPullParserException, IOException {
rInflate(parser, parent, parent.getContext(), attrs, finishInflate);
}

void rInflate(XmlPullParser parser, View parent, Context context,
AttributeSet attrs, boolean finishInflate) throws XmlPullParserException, IOException {

final int depth = parser.getDepth();
int type;
boolean pendingRequestFocus = false;

//循环便利布局,直到布局完成
while (((type = parser.next()) != XmlPullParser.END_TAG ||
parser.getDepth() > depth) && type != XmlPullParser.END_DOCUMENT) {

...
//获取当前布局的View
final View view = createViewFromTag(parent, name, context, attrs);
final ViewGroup viewGroup = (ViewGroup) parent;
final ViewGroup.LayoutParams params = viewGroup.generateLayoutParams(attrs);
//渲染当前布局View的孩子们
rInflateChildren(parser, view, attrs, true);
//组合为ViewGroup
viewGroup.addView(view, params);
}
}

if (pendingRequestFocus) {
parent.restoreDefaultFocus();
}

if (finishInflate) {
parent.onFinishInflate();
}
}

进入createViewFromTag():

1
2
3
4
5
6
7
8
9
10
11
12
13
14
15
16
17
18
19
20
21
22
23
24
25
26
27
28
29
30
31
32
33
34
35
36
37
38
39
//android.view.LayoutInflater
View createViewFromTag(View parent, String name, Context context, AttributeSet attrs,
boolean ignoreThemeAttr) {
if (name.equals("view")) {
name = attrs.getAttributeValue(null, "class");
}

// Apply a theme wrapper, if allowed and one is specified.
if (!ignoreThemeAttr) {
final TypedArray ta = context.obtainStyledAttributes(attrs, ATTRS_THEME);
final int themeResId = ta.getResourceId(0, 0);
if (themeResId != 0) {
context = new ContextThemeWrapper(context, themeResId);
}
ta.recycle();
}

try {
View view = tryCreateView(parent, name, context, attrs);

if (view == null) {
final Object lastContext = mConstructorArgs[0];
mConstructorArgs[0] = context;
try {
if (-1 == name.indexOf('.')) {
view = onCreateView(context, parent, name, attrs);
} else {
view = createView(context, name, null, attrs);
}
} finally {
mConstructorArgs[0] = lastContext;
}
}

return view;
} catch (InflateException e) {
...
}
}

进行tryCreateView方法,如果view为null,则执行onCreateView或者createView方法,

无论是onCreateView还是createView最终都会进入如下函数:

1
2
3
4
5
6
7
8
9
10
11
12
13
14
15
16
17
18
19
20
21
22
23
24
25
26
27
28
29
30
31
32
33
34
35
36
37
38
39
40
41
42
43
44
45
46
47
48
49
50
51
52
53
54
55
56
57
58
59
60
61
62
63
64
65
66
67
68
69
70
71
@Nullable
public final View createView(@NonNull Context viewContext, @NonNull String name,
@Nullable String prefix, @Nullable AttributeSet attrs)
throws ClassNotFoundException, InflateException {
Objects.requireNonNull(viewContext);
Objects.requireNonNull(name);
Constructor<? extends View> constructor = sConstructorMap.get(name);
if (constructor != null && !verifyClassLoader(constructor)) {
constructor = null;
sConstructorMap.remove(name);
}
Class<? extends View> clazz = null;

try {
Trace.traceBegin(Trace.TRACE_TAG_VIEW, name);

if (constructor == null) {
// Class not found in the cache, see if it's real, and try to add it
clazz = Class.forName(prefix != null ? (prefix + name) : name, false,
mContext.getClassLoader()).asSubclass(View.class);

if (mFilter != null && clazz != null) {
boolean allowed = mFilter.onLoadClass(clazz);
if (!allowed) {
failNotAllowed(name, prefix, viewContext, attrs);
}
}
constructor = clazz.getConstructor(mConstructorSignature);
constructor.setAccessible(true);
sConstructorMap.put(name, constructor);
} else {
// If we have a filter, apply it to cached constructor
if (mFilter != null) {
// Have we seen this name before?
Boolean allowedState = mFilterMap.get(name);
if (allowedState == null) {
// New class -- remember whether it is allowed
clazz = Class.forName(prefix != null ? (prefix + name) : name, false,
mContext.getClassLoader()).asSubclass(View.class);

boolean allowed = clazz != null && mFilter.onLoadClass(clazz);
mFilterMap.put(name, allowed);
if (!allowed) {
failNotAllowed(name, prefix, viewContext, attrs);
}
} else if (allowedState.equals(Boolean.FALSE)) {
failNotAllowed(name, prefix, viewContext, attrs);
}
}
}

Object lastContext = mConstructorArgs[0];
mConstructorArgs[0] = viewContext;
Object[] args = mConstructorArgs;
args[1] = attrs;

try {
final View view = constructor.newInstance(args);
if (view instanceof ViewStub) {
// Use the same context when inflating ViewStub later.
final ViewStub viewStub = (ViewStub) view;
viewStub.setLayoutInflater(cloneInContext((Context) args[0]));
}
return view;
} finally {
mConstructorArgs[0] = lastContext;
}
} catch (NoSuchMethodException e) {
...
}
}

简单看一下可以确认是通过反射实现的

然后我们进入tryCreateView()方法:

1
2
3
4
5
6
7
8
9
10
11
12
13
14
15
16
17
18
19
20
21
22
23
24
25
//android.view.LayoutInflater
public final View tryCreateView(@Nullable View parent, @NonNull String name,
@NonNull Context context,
@NonNull AttributeSet attrs) {
if (name.equals(TAG_1995)) {
// Let's party like it's 1995!
return new BlinkLayout(context, attrs);
}

View view;
if (mFactory2 != null) {
//系统一般会创建Factory2的对象
view = mFactory2.onCreateView(parent, name, context, attrs);
} else if (mFactory != null) {
view = mFactory.onCreateView(name, context, attrs);
} else {
view = null;
}

if (view == null && mPrivateFactory != null) {
view = mPrivateFactory.onCreateView(parent, name, context, attrs);
}

return view;
}

那这个mFactory2/mFactory.onCreateView()要走哪里呢?Factory实例在哪里呢?

接下来

我们需要分析setContenView()之前都做了什么

1
2
3
4
5
@Override
protected void onCreate(Bundle savedInstanceState) {
super.onCreate(savedInstanceState);
setContentView(R.layout.activity_main);
}

点击super.onCreate(saveInstanceState)方法:

1
2
3
4
5
6
7
8
//androidx.appcompat.app.AppCompatActivity
@Override
protected void onCreate(@Nullable Bundle savedInstanceState) {
final AppCompatDelegate delegate = getDelegate();
delegate.installViewFactory();
delegate.onCreate(savedInstanceState);
super.onCreate(savedInstanceState);
}

进入installViewFactory()方法:

1
2
3
4
5
6
7
8
9
10
11
12
13
//androidx.appcompat.app.AppCompatDelegateImpl
@Override
public void installViewFactory() {
LayoutInflater layoutInflater = LayoutInflater.from(mContext);
if (layoutInflater.getFactory() == null) {
LayoutInflaterCompat.setFactory2(layoutInflater, this);
} else {
if (!(layoutInflater.getFactory2() instanceof AppCompatDelegateImpl)) {
Log.i(TAG, "The Activity's LayoutInflater already has a Factory installed"
+ " so we can not install AppCompat's");
}
}
}

首先通过获取layoutInflater.getFactory()进行获取,如果没有就会setFactory2进行设置。

在其中进行setFactory初始化,注意第二个参数,传入的是this,那么,我们看一下这个类:

1
2
class AppCompatDelegateImpl extends AppCompatDelegate
implements MenuBuilder.Callback, LayoutInflater.Factory2

很好,他是一个实现Factory2接口的类,那么我们直接找onCreateView的实现:

1
2
3
4
5
6
7
8
9
10
11
12
@Override
public View createView(View parent, final String name, @NonNull Context context,
@NonNull AttributeSet attrs) {
...
mAppCompatViewInflater = new AppCompatViewInflater();
...
return mAppCompatViewInflater.createView(parent, name, context, attrs, inheritContext,
IS_PRE_LOLLIPOP, /* Only read android:theme pre-L (L+ handles this anyway) */
true, /* Read read app:theme as a fallback at all times for legacy reasons */
VectorEnabledTintResources.shouldBeUsed() /* Only tint wrap the context if enabled */
);
}

其实调用的是AppcompatViewInflater.createView()方法:

1
2
3
4
5
6
7
8
9
10
11
12
13
14
15
16
17
18
19
20
21
22
23
24
25
final View createView(View parent, final String name, @NonNull Context context,
@NonNull AttributeSet attrs, boolean inheritContext,
boolean readAndroidTheme, boolean readAppTheme, boolean wrapContext) {
...
switch (name) {
case "TextView":
view = createTextView(context, attrs);
verifyNotNull(view, name);
break;
...
default:
// The fallback that allows extending class to take over view inflation
// for other tags. Note that we don't check that the result is not-null.
// That allows the custom inflater path to fall back on the default one
// later in this method.
view = createView(context, name, attrs);
}
...
return view;
}

@NonNull
protected AppCompatTextView createTextView(Context context, AttributeSet attrs) {
return new AppCompatTextView(context, attrs);
}

通过new的方式新建view,如果switch没有得到处理,则返回view为null,通过反射处理即可

我们要怎么做?

Factory和Factory2的区别是什么?

可惜我们不能从文档说明上获得什么,我们就直接看代码吧

1
2
3
4
5
6
7
8
9
10
11
12
    public interface Factory {
@Nullable
View onCreateView(@NonNull String name, @NonNull Context context,
@NonNull AttributeSet attrs);
}

public interface Factory2 extends Factory {

@Nullable
View onCreateView(@Nullable View parent, @NonNull String name,
@NonNull Context context, @NonNull AttributeSet attrs);
}

字段中多了一个View的父类,可以认为Factory2是对Factory的重载

在分析过程中,我们发现

1
2
3
4
5
6
7
8
9
10
11
12
13
    //androidx.appcompat.app.AppCompatDelegateImpl
@Override
public void installViewFactory() {
LayoutInflater layoutInflater = LayoutInflater.from(mContext);
if (layoutInflater.getFactory() == null) {
LayoutInflaterCompat.setFactory2(layoutInflater, this);
} else {
if (!(layoutInflater.getFactory2() instanceof AppCompatDelegateImpl)) {
Log.i(TAG, "The Activity's LayoutInflater already has a Factory installed"
+ " so we can not install AppCompat's");
}
}
}

系统的处理是默认会取Factory,如果没有,才会新建,走AppCompatDelegateImpl,如果我们在这个super.onCreate()方法之前设置Factory就可以让系统走我们的Factory实现

具体实现

最终我们在Activity的onCreate方法之前执行我们的设置

1
2
3
4
5
@Override
protected void onCreate(@Nullable Bundle savedInstanceState) {
LayoutInflaterCompat.setFactory(getLayoutInflater(), getSkinDelegate());
super.onCreate(savedInstanceState);
}

同时在createView方法中生成自己的view,在view中设置刷新接口,通过观察者模式在模式变化的时候通知所有的view,变更背景色,字体色等,不需要重新构建Activity,避免闪屏